Game Over
I've never actually played The Sims. But when I happened upon this scene at the Salt Lake City Cemetery, I immediately thought of the popular computer simulation game.
Canon 30D, Canon 24-105 f/4L - 1/320 second, f/4, ISO 100

I've never actually played The Sims. But when I happened upon this scene at the Salt Lake City Cemetery, I immediately thought of the popular computer simulation game.
Canon 30D, Canon 24-105 f/4L - 1/320 second, f/4, ISO 100
In a comment on a post from a week ago, Charles wrote:
"I like too much this BW portrait. Could you tell me how you post-processed it to give this smooth and bright look?"
Thanks for the question Charles. The process I use in smoothing and brightening the skin is a relatively simple process. I use Photoshop CS2 for my editing, so I will detail the steps I take in that program. I believe you could easily use a similar process in Gimp, Elements or Paint Shop Pro though I haven't used these programs so I do not know for sure.
1. Select your your main layer and adjust the brightness upwards to approximately +35-45%. The image will appear washed out, but you will recover the detail in the following steps.
2. Create a copy of the main layer.
3. Select a blur option (I use Gaussian Blur) and apply it liberally to the new layer. On a large image, I use a blur radius of around 40-50 pixels.
4. On the now-blurred layer, select LAYER, LAYER STYLE, BLENDING OPTIONS (from the menu) and set the BLEND MODE. I use either MULTIPLY or OVERLAY. Now lower the OPACITY to somewhere in the 40-60% range (set it how you like the image best).
5. (Optional) Convert the image to black & white. I don't do a simple de-saturate. Instead, I create a new CHANNEL MIXER layer and check the MONOCHROME box. I can then adjust the three channels (red, green & blue) to obtain the b&w tone I desire.
6. For a final touch, I create a MASK on the top layer (the one with the blur) and mask out areas that I wish to remain crisp such as the eyes.
While I don't proclaim to be a Photoshop Guru (there are plenty of them around already), these are the steps I use in many of my black & white conversions. I find the soft tone and bright eyes create a pleasing result.
Today's image of young Christian is a good example of this process.
a - lone [uh-lohn]
-adjective (used predicatively)
1. separate, apart, or isolated from others: I want to be alone.
2. to the exclusion of all others or all else: One cannot live by bread alone.
3. unique; unequaled; unexcelled: He is alone among his peers in devotion to duty.
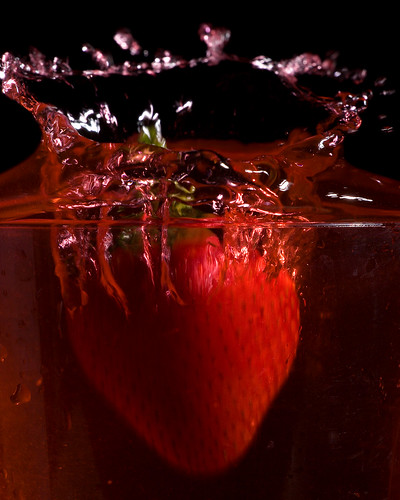
Yesterday I posted some shots of a strawberry splashing into a drink with a brief explanation of how I did the shot (see the post here). I was really surprised at the amount of email I received asking for more information on how I created the shots. To answer these questions, here is a more detailed explanation of how I created the shots.
Lighting
I use relatively inexpensive studio lights (I purchased a two light set from Adorama for under $300). These lights are fairly low power (guide # 100) but work well on close in shots. Each of the shots was made with one light placed at approximately 85 degrees from the camera. I fire the lights with a sync cable connected to my Canon 30D. If you are using a camera that doesn't have a sync cable port (Canon Rebel for example), you can fire the lights using a hotshoe sync adapter. This relatively inexpensive piece fits on the camera hotshoe and has a place to plug your lighting into. You can also fire the lights via slave from your camera's onboard flash, but this has a tendency to adversely affect your lighting.
On the lights I use either a barndoor or a snoot attachment. This eliminates the light from splashing on the background and the camera lens.
Metering
I use a handheld meter to get a true reading of the lighting output. This step can save quite a bit of time in post processing. If you don't have a handheld meter, bracket a number of shots and then view them on your computer to determine the best exposure.
Camera
My primary camera is a Canon 30D SLR. The great part about using an SLR is the near-immediate shutter release when the button is pushed. Timing is critical in catching the splashes and having a fast acting camera is very nice. I have tried these shots with a point-n-shoot camera. It is a bit trickier to time the shots, but it can be done.
I have the camera on a tripod and use a remote cable release. I drop the strawberry with one hand and fire the camera with the other. When I have a helper (usually a daughter), I have her drop the object while I fire the camera.
I prefer to shoot these shots with a telephoto lens for two reasons. The first being that it creates a narrow depth-of-field and throws the background completely out of focus. Secondly, it keeps the camera clear of the "splash zone".
Background
For a background in these shots, I am just using a black sheet. Like a said earlier, by using the barndoor attachment on the light, I am able to keep the flash off of the background thus making it underexposed and "true black".
Props
I have used several different items in my splash shots. I have dropped cookies into milk, cream into coffee, and as we see here strawberries into strawberry lemonade. In this instance my strawberry lemonade is simply water with food coloring. I try to avoid sugary liquids due to the stickiness it causes on everything it hits (occasional camera/lens included).
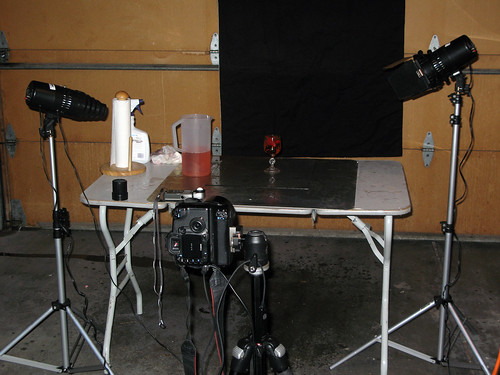
Studio
My studio is rather low-tech. This shot shows a typical splash-shot setup in my garage. I have long since lost the privilege of taking these shots in the house due to the mess it creates.
Post Processing
I use Photoshop CS2 (on a Mac) for my processing. These shots required very little work. I converted the image from RAW format using Adobe Camera Raw, then cropped and applied a small amount of sharpening.
Conclusion
As you can see, this is a relatively easy type of photography to do. The fun part is to just be creative. I had one comment questioning the usefulness of these shots. I really don't have a use for them. I sell an occasional splash photo on iStockPhoto, but other then that I just consider it art.
Give it a try and see what you can create.
Labels: tutorial
How about a splash of RED to brighten up your Wednesday?
I made this capture of a strawberry splashing into a glass of red liquid (simulated strawberry lemonade) by placing a studio flash directly to the right and slightly above the glass of liquid. I fired the camera with one hand while dropping the strawberry with the other. The timing was a bit tricky at first, but after a few attempts it wasn't too difficult.
Tips
- Fill the glass completely to the rim to cause the splash to swell over the top.
- Use barn-doors (or a similar barrier) to block the strobe from lighting the backdrop and/or the lens.
- Use a longer lens (medium telephoto) to get your camera out of the splash zone.
- Use a cable release or remote to fire the camera (while dropping the fruit).
- Use water with food coloring for the liquid (the sugar in real beverages can leave your camera gear a bit 'sticky' if it gets splashed).
Here's another example:

Labels: tutorial
Today is Presidents Day in the U.S. so I selected this capture of a bald eagle in honor of the occasion. Why the bird? The bald eagle is prominently displayed as a symbol of freedom on the Seal of the President of the United States. But you already knew that, didn't you?
Enjoy your day off.
Canon 30D, Canon Canon 70-200 f/4L lens with 1.4 extender - 1/800 second, f/5.6, ISO 100
This shot makes me smile. The camera was able to catch the girls during a great moment of joy at the skating rink. Do you remember days like this in your childhood, before the stress and worries of adult life set in?
Special thanks to the fine folks over at New West Network. They selected this shot to use recently on their home page:
Canon 30D, Canon 24-105 f/4L IS lens - 1/60 second, f/5, ISO 400
I spent some time yesterday afternoon (Valentine's Day) with my wife photographing at our daughters' school. The school was holding its annual Sixth Grade Dance and we were asked to shoot portraits of the kids in their Sunday best. My favorite shot of the day was the first one taken. I asked Elisabeth to step in for a moment so I could test the lighting, and as she did her friends were laughing at her. Her relaxed fun expression made for a great spontaneous capture.
I processed the shot in black & white with a bit of colorization applied in Photoshop (the subtle gold tone in her hair). Her outfit and the seamless background work well with a somewhat high key presentation.
Canon 30D, Canon 24-105 f/4L IS lens - 1/30 second, f/4, ISO 100
Okay, I get it. In the past three weeks I've only posted one photograph with a person in it, and that was just a shot of some guy holding a sign at a basketball game. So enough with the birds, smoke, fish and lightbulbs - today I'm posting a portrait!
My family enjoyed the privilege of having this young man spend the evening with us last night while his mom and dad were out. He's quite the charmer, so I grabbed the Canon and snapped a few shots. I made this capture from across the room with a rather long lens while he was playing with my daughter.
Canon 30D, Canon 300 f/2.8L IS lens - 1/50 second, f/2.8, ISO 100
Today marks seven days since my post of a burning lightbulb made #1 on the news aggregate website digg.com. I have always heard about "The Digg Effect" (a term to refer to the huge influx of traffic generated by a story on digg) and wondered how much traffic is generated. Now I know.
Prior to February 5th, this website averaged around 300 - 400 visitors a day. While this is not a huge number, it had been gradually growing over the 14 month period of the site's existence. Then the story hit on digg and here is what happened:
Monday February 5 - 126,742
Tuesday February 6 - 25,258
Wednesday February 7 - 12,199
Thursday February 8 - 6,211
Friday February 9 - 4,310
Saturday February 10 - 4,216
Sunday February 11 - 3,776
That's 183,716 page loads from 158,312 unique visitors in the past week. If I remove my previous average of 300-400 per day, that is over 180,000 hits generated as a result of the digg story. Wow!
One thing I didn't expect with the notoriety on digg was the amount of traffic from other websites that this would create. While digg generated most of the hits the first day or two, other sites began referring hits to me. Here is a breakdown of where the most of the traffic came from over the past seven days:
digg.com - 63.86%
reddit.com - 10.06%
direct - 5.40%
stumbleupon.com - 4.30%
monitor.hr - 2.25%
bluesnews.com - 1.38%
clicked.msnbc.msn.com - 1.35%
A frequent outcome of websites being dugg is that the server is unable to handle the huge increase in traffic. In my case, this traffic was approximately 10,000 hits per hour in the first 12 hours of being on the front page of digg. LeggNet.com handled the traffic extremely well with the only hiccup being a slight slowdown on Monday afternoon that required a reboot. Thankfully, I have unlimited bandwidth on my hosting account.
My hope from this experience is that some of the visitors that have found my site in the past week will continue visiting. The increase in comments and email has been great. Thank you.
-Rich
p.s. If you'd like to monitor LeggNet.com via RSS, please add http://leggnet.com/rss/leggnet.xml to your reader.
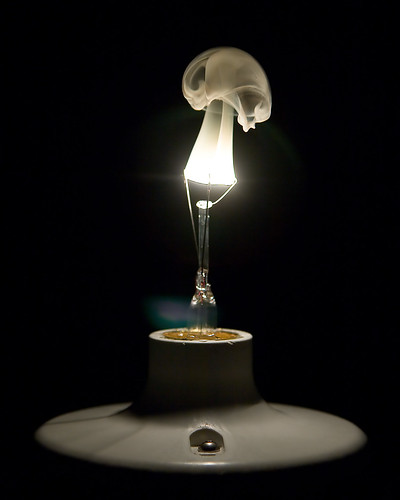
After all of the attention my post showing photos of lightbulbs burning out received last week, I thought I'd post another one. This capture shows the burning bulb a moment later than my earlier shots. The mushroom looking cloud (we'll ignore other similarities) has floated up and is beginning to dissipate in this version. It is interesting to note that in nearly all of the photos the smoke plume is drifting to the right. I would guess that subtle airflow in the room is the reason.
To photograph this, I fired 8-10 shot bursts with my camera at 5 frames per second to increase my odds of capturing an interesting photo. I manually calculated the exposure after taking a few test shots. The only post processing I have done to this image is cropping, noise reduction and contrast adjustment (all in Photoshop CS2).
Links:
Previous LeggNet.com Post
Story on Digg.com
My Smoke Shots on Flickr
Canon 30D, Canon 24-105 f/4L IS lens - 1/640 second, f/4, ISO 100
This capture of a bald eagle was shot in the Centerville area North of Utah's Great Salt Lake. The stately bird was perched in a tree alongside a road near the Farmington Bay Waterfowl Management Area. The eagles are beginning to arrive in the area and will stay for most of the month of February. People have talked of seeing hundreds of the birds at the peak of the winter layover. On my recent visit, I was able to spot a couple dozen, though most were quite a distance from the road.
Canon 30D, Canon 70-200 f/4L lens with 1.4 extender - 1/640 second, f/5.6, ISO 100
The textures of the dried petals on this pair of dead roses were extremely inviting to photograph. I used the longest lens in my bag to throw the background completely out of focus and create the silky smooth bokeh.
Canon 30D, Canon 70-200 f/4L lens with 1.4 extender - 1/200 second, f/5.6, ISO 400
This beautifully striped fish was photographed at the Living Planet aquarium in Sandy, Utah. I would like to say that my extensive knowledge of tropical saltwater marine life allowed me to correctly identify this species, but that would be an absolute lie. It took a commenter on Flickr to inform me that this is a Banggai Cardinalfish. And now I know.
Canon 30D, Canon 24-105 f/4L IS lens - 1/30 second, f/4, ISO 400(Canon 30D, Canon 24-105 f/4L IS lens - 1/640 second, f/4, ISO 100)
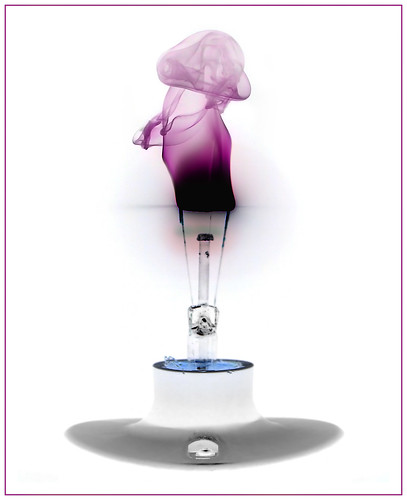
What you are seeing is a capture of a lightbulb in the process of burning out. To create the shot, my friend Harley and I removed the glass enclosure of a standard household lightbulb (while leaving the innards intact) and powered it up in a pitch black room. The result was an immediate burn-out, which we were all too ready to photograph. The red hue on the smoke was added in post-processing.
Here's one more I did inverting the shot:
(Canon 30D, Canon 24-105 f/4L IS lens - 1/1000 second, f/4, ISO 100)
For detailed instructions on making a similar shot, visit DIYPhotography.net.

Labels: tutorial
I captured these two Northern Harriers squabbling over a half eaten fish in the Farmington Bay Waterfowl Management Area (FBWMA) near Bountiful Utah. The area is located just North of Utah's Great Salt Lake and is filled with many different species of birds. I was actually looking to photograph bald eagles on this trip since this is an area where many of them spend the winter months. All of the eagles I spotted were too far away for a decent photo, so I spent my time watching the harriers.
For more information on the FBWMA, click here.
In recognition of this being Groundhog day, meet Philip, my daughter's Groundhog.
From Wikipedia:
"Groundhog Day is a traditional festival celebrated in the United States and Canada on February 2. It is a cross-quarter day, midway between the Winter Solstice and the Vernal Equinox.
In traditional weather lore, if a groundhog emerges from its burrow on this day and fails to see its shadow because the weather is cloudy, winter will soon end. If the groundhog sees its shadow because the weather is bright and clear, it will be frightened and run back into its hole, and the winter will continue for six more weeks."