


Photoshop Tip: An Alternative to Brightness/Contrast
When editing my images in Photoshop, I always begin with a couple simple adjustment steps before venturing into the more advanced edits. Since I shoot most of my shots around 1/3 f/stop underexposed (to preserve highlights), the first simple editing step I do is an adjustment to the brightness/contrast of the image. But guess what? I don't use the brightness/contrast adjustment to do this. I use LEVELS.
By using the LEVELS adjustment, I am able to fine tune the brightness of the image while causing very little damage. This is extremely important in my stock images since they have to go through a rigorous inspection process to be included in my portfolio. Here are the simple steps I use:
1. Create a new LEVELS adjust layer.
2. Slide the upper clipping adjustment (red circle below) down until it is just above the upper end of the histogram.
3. Slide the lower clipping adjustment (blue circle below) up until it is just below the lower end of the histogram.
4. Inspect image and fine tune the adjustments as needed
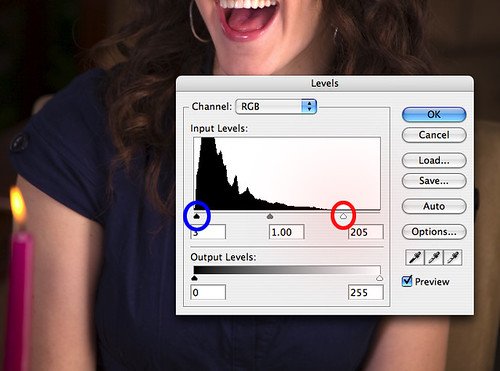
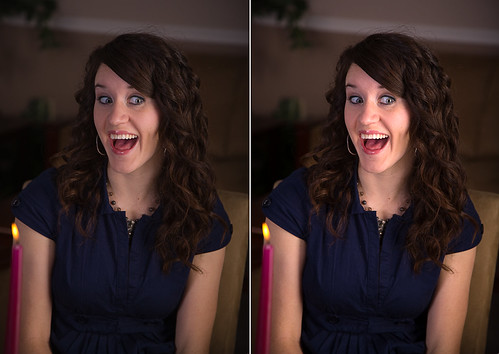
As you can see in today's featured image, the sample on the right 'pops' quite a bit more than the original on the left. This was done strictly using the levels adjustment. Once I complete this step, I then go on and finish my editing of the image.
If you haven't tried adjusting brightness/contrast this way, give it a shot and see how well it works for you.

6 Comments:
Great visual example on this. This is one of my favorite methods as well, though I often prefer to do each color channel independent of each other to allow for color balance adjustments while I adjust for brightness as well. Lately I have been trying to use curves more simply for diversity, but I often find myself coming back to this tried and true method.
I try to do most of my exposure adjustment when working with my RAW files in Lightroom. If I do work on something more in Photoshop I tend to use Levels and Curves adjustment layers.
Handy tip, setup your keyboard shortcuts in Photoshop to open adjustment layers rather than the standard non-layer adjustments. For example, when I use Command+L it opens a new Layers adjustment layer. When I press Command+B it opens a new Color Balance adjustment layer. I'm on a Mac so its the Command or Apple key. For you PC folks that the Ctrl key I'm talking about. Using adjustment layers in this way makes it fast and simple.
That's a good tip, Rich. Like the previous poster, I also do my exposure adjustment in Lightroom before going into PS, but I'll have to think this one and see if I could incorporate this info workflow regardless.
Do you use Lightroom at all?
This is a great tip. I am going to show my ignorance here...um, do you ever mess with the middle adjustment? and what about the one underneath?
I use photoshop elements 6, but it has the same levels adjustment.
Levels are a great tool, but there's a lot of wasted information in the shadows. Each successively darker stop contains half as much information, and "pulling" information back redistributes that information very poorly: noise being one of the major concerns.
By "exposing right", and getting your highlights bumping up against the right side, you're preserving all that shadow information to redistribute towards the left... this is a much cleaner approach, and can effectively lower your ISO a stop or more.
Re: Jeremy: That only works if brightest part of your image is white. A grey tone will typically be the brightest, but not always. If white is not the brightest, and you use per-channel levels adjustments, you will end up introducing a color cast.
@Leviathor: Yes, this is true what you say, and I also truly do most of these kind of adjustments first in RAW as others have stated. I often do like to make additional minor color cast and brightness/contrast settings in a final post adjustment with individual channels thought to my taste. With that in mind I am usually making these adjustments to true up the colors rather that create a cast. Good point though!
Post a Comment
<< Home